本文共 2347 字,大约阅读时间需要 7 分钟。

wps自动图文集 重新编号

Creating and using custom AutoText entries for frequently used phrases is a great way to speed up the content creation process in Microsoft Word. And the good news is you can set up these time-savers in just a few clicks!
为常用短语创建和使用自定义自动图文集词条是加快Microsoft Word内容创建过程的好方法。 好消息是,您只需单击几下就可以设置这些省时功能!
如何创建一个新的自动图文集词条 (How to Create a New AutoText Entry)
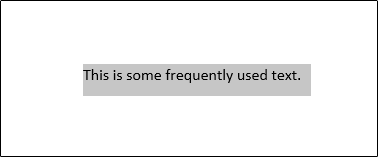
To get started, highlight the text in your Word document that you’d like to use to create your new AutoText entry.
首先,突出显示您要用于创建新的自动图文集词条的Word文档中的文本。
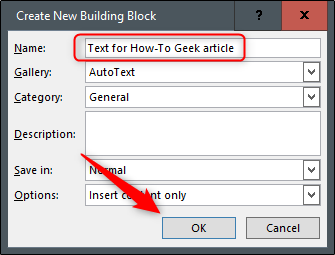
Press Alt+F3 to open the “Create New Building Block” window. Next, type a memorable name (within the 32-character limit) for your AutoText entry, and then click “OK.”
按Alt + F3打开“创建新的构建基块”窗口。 接下来,为您的自动图文集键入一个令人难忘的名称(不超过32个字符),然后单击“确定”。
Your AutoText entry is now saved.
您的自动图文集词条现已保存。
如何使用自动图文集词条 (How to Use an AutoText Entry)
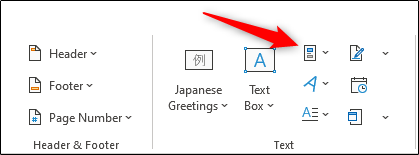
To use your AutoText entry, place your cursor where you want to insert the text in your Word document. Navigate to the “Insert” tab and click the Explore Quick Parts icon in the “Text” group.
若要使用自动图文集词条,请将光标放在要在Word文档中插入文本的位置。 导航到“插入”选项卡,然后单击“文本”组中的“浏览快速零件”图标。
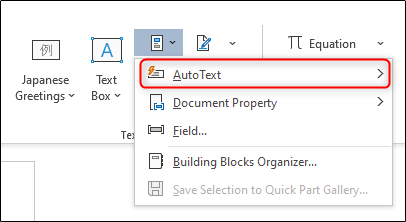
In the drop-down menu that appears, hover over “AutoText.”
在出现的下拉菜单中,将鼠标悬停在“自动图文集”上。
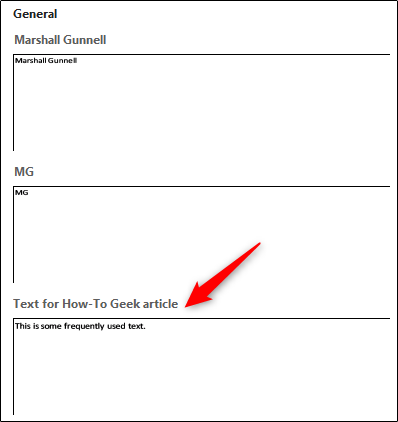
A list of AutoText entries appears; select the one you want to use. For this example, we’ll use our custom entry.
出现自动图文集条目列表; 选择您要使用的那个。 在此示例中,我们将使用我们的自定义条目。
The text is inserted into your Word document.
文本将插入到您的Word文档中。
如何删除自动图文集词条 (How to Delete an AutoText Entry)
If your AutoText list is getting a bit long, or you made a mistake when you created a custom entry, you can delete them.
如果自动图文集列表过长,或者在创建自定义条目时犯了一个错误,则可以将其删除。
To do so, go back to the “Insert” tab and select the “Text” group. Click the Explore Quick Parts icon, and then hover over “AutoText.”
为此,请返回“插入”选项卡,然后选择“文本”组。 单击“浏览快速零件”图标,然后将鼠标悬停在“自动图文集”上。
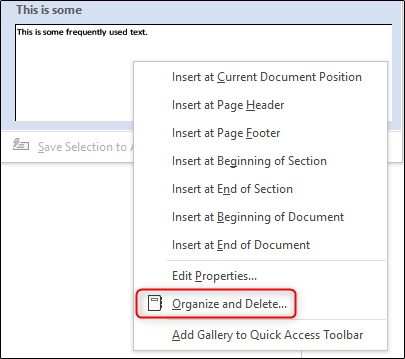
Right-click the AutoText entry you want to delete. In the menu that appears, click “Organize and Delete.”
用鼠标右键单击要删除的自动图文集词条。 在出现的菜单中,单击“组织和删除”。
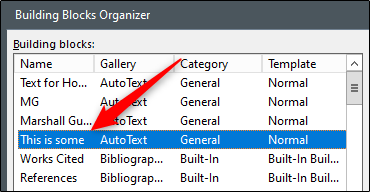
The “Building Blocks Organizer” window appears with the AutoText entry you right-clicked highlighted.
出现“ Building Blocks Organizer”窗口,右键单击自动图文集条目,突出显示。
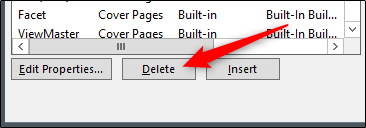
At the bottom of the window, click “Delete.”
在窗口底部,单击“删除”。
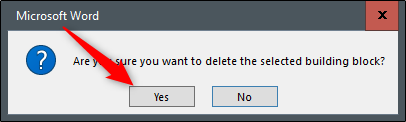
A message appears asking you to confirm that you would like to delete this entry; click “Yes.”
出现一条消息,要求您确认要删除此条目; 点击“是”。
The AutoText entry is deleted.
自动图文集词条被删除。
翻译自:
wps自动图文集 重新编号
转载地址:http://ihfwd.baihongyu.com/